
What to Put in a CRE Client Portal for Your Listings
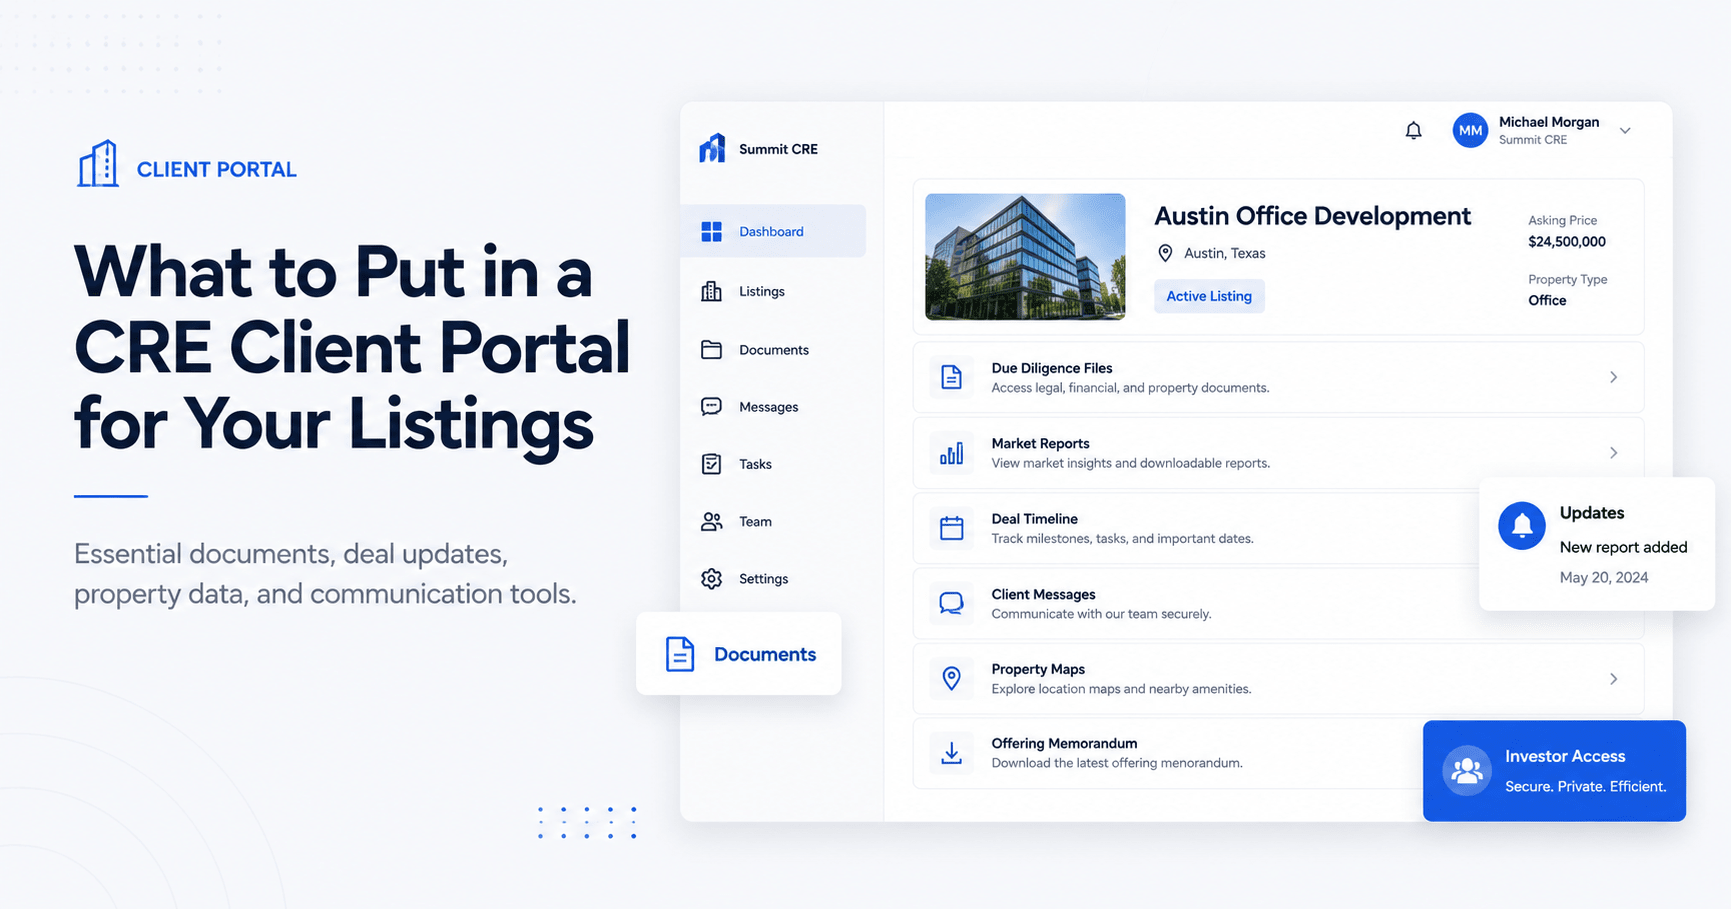
Brokers typically update seller clients via a static weekly email – if they even remember to send one. A dedicated CRE client portal is a better solution: a live dashboard where the seller can see exactly what’s happening with their listing in real time. This guide covers the key CRE client portal features and explains what to include in each section to keep clients informed and confident.
A well-designed CRE client portal features everything a seller asks about their listing on one page. It includes weekly updates, an offers dashboard, buyer pipeline details, data-room metrics, and marketing analytics. These features keep clients informed and confident by answering “What’s happening?” in real time.
Core CRE Client Portal Features
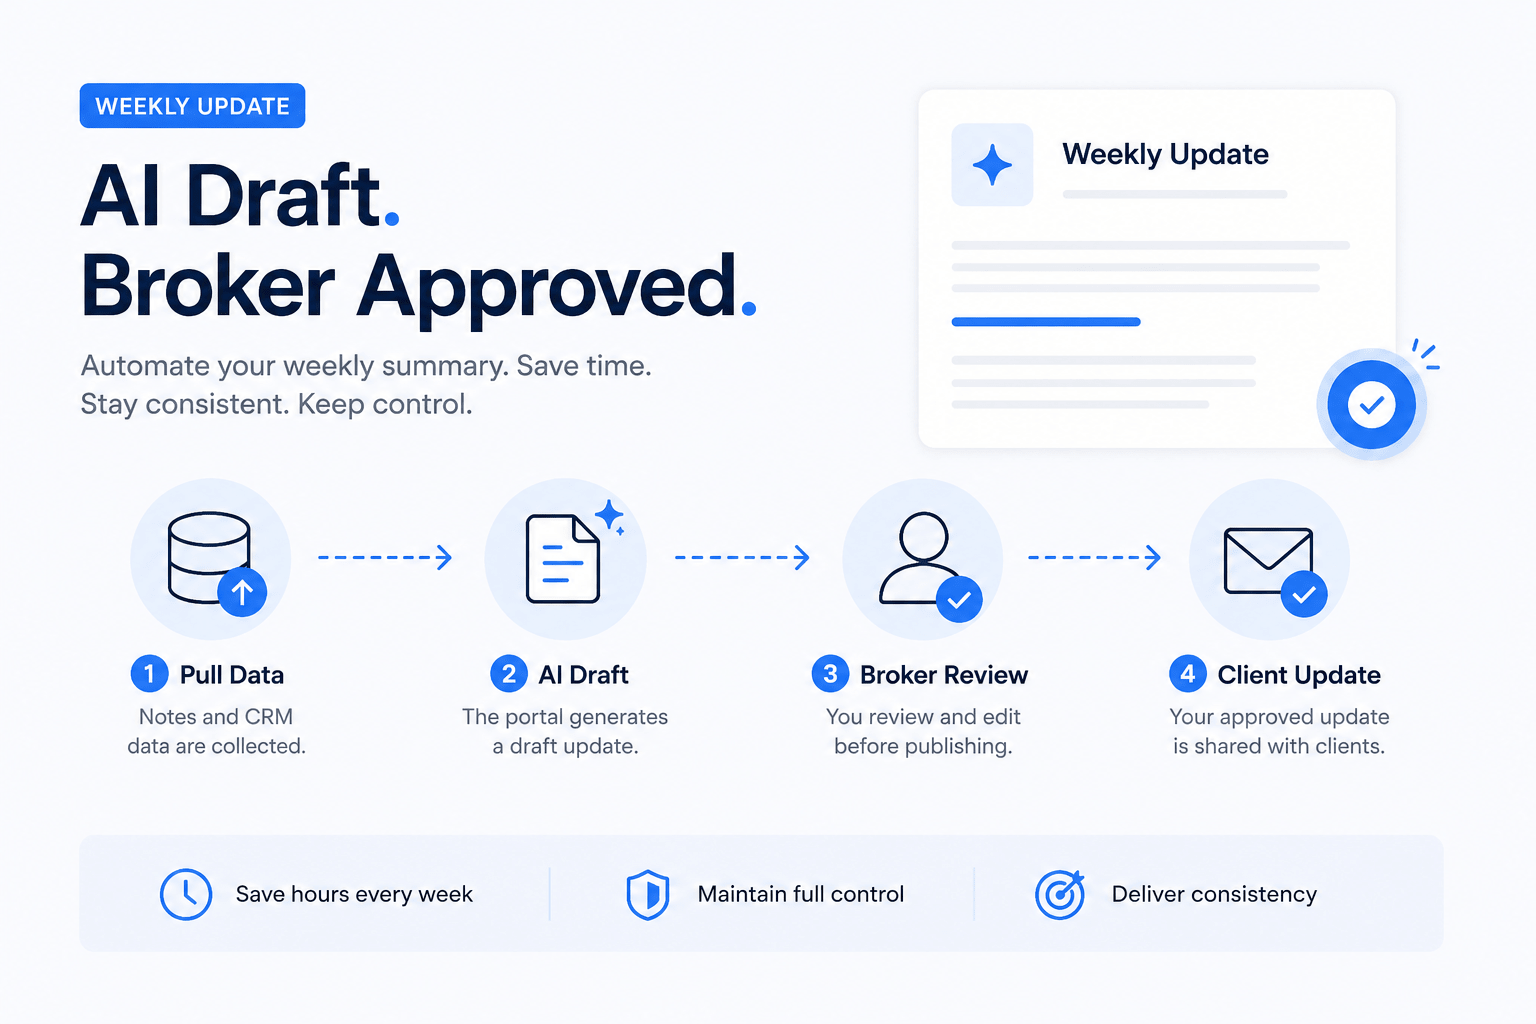
Weekly Update (AI Draft, Broker Approved):
Automate your weekly summary. The portal can generate a draft report by pulling notes and CRM data, which the broker quickly reviews and publishes. In practice, this means a seller sees a polished update without you writing every line. As industry experts note, “using AI regularly is now the expected baseline” in CRE workflows. You keep full control by editing before publishing – the client only ever sees your approved update. This replaces that slow Friday email and ensures consistency without extra Friday effort.
Offer Dashboard:
The very first question sellers ask is “Did we get any offers?” Put all active offers front and center. List each bidder, price, and key terms. Highlight which offer is currently leading (highest or best terms). For example, portals can display multiple offers and flag the top one so a seller can see in seconds where the action is. Including terms and dates in this section answers “What’s on the table?” immediately, without any phone call.
Buyer Pipeline (Mini-CRM View):
Show the funnel behind the offers. List all interested parties and where they are in the process (tour scheduled, diligence pending, etc.). Include names (or anonymized IDs), last activity date, and status. Even noting buyers who passed (e.g., “Tour completed – passed”) gives sellers market context. Sellers want to know who toured the property and which prospects are “circling.” This pipeline view is essentially a simple CRM report embedded in the portal: it answers “Who’s interested?” and helps guide pricing discussions.
Similarly, strong deal pipeline tracking helps brokers organize buyer activity and gives sellers a clearer picture of who is progressing toward an offer.
Data-Room Activity:
Indicate due diligence momentum. Show which buyers have accessed the online data room or downloaded the offering memorandum. This is a key buying signal – a buyer digging into the financials is serious. For instance, Real Capital Markets notes their deal rooms let brokers “track whose reviewed the documents and where a deal is in the process”. Including a data-room panel in your portal means the seller can see which firms have looked at the OM and project plans. That level of detail never makes it into a simple email, and it makes your portal feel live and transparent.
Marketing Metrics:
Prove your marketing effort with hard numbers. Include stats like total listing views, number of times the OM has been downloaded, number of tours booked, and days on market. A simple chart or counters (e.g., “2,200+ listing page views”, “15 tours”) shows the seller you’re exposing their property to buyers. These concrete figures answer “Are you marketing it?” before the seller even asks. Display them over time (an upward-trending graph of views, for example) to build confidence that the listing is getting traction.
Sources Panel:
Transparency is key. Include a panel or feed that shows where the portal’s information came from – for example, notes you’ve entered, CRM updates, or call transcripts. This makes your portal self-documenting: if you had a call with the owner, the portal can link to the note or recording that fed into the weekly update. This “data sources” section ensures nothing slips through the cracks and keeps updates maintainable. In short, it shows that all portal content is grounded in real inputs.
For example, many brokers use AI-powered CRM dashboards to automatically pull updates, notes, and buyer activity into a centralized reporting system.
The reporting experience depends on the systems behind it. This demo shows how a broker CRM can collect activity, notes, and deal information that later feeds a client portal.
Deal Milestones Timeline:
Add a simple timeline of key listing events so sellers see progress. Examples: “Listing Agreement Signed → Market Launch → First Tour → OM Posted → Offer Received → Under Contract.” You can draw this as a visual timeline. (See example below.) This timeline gives sellers a sense of momentum even before offers come in, and it answers “What’s next?” by showing upcoming steps like accepted offer or anticipated closing date. It reinforces that you have a plan and keeps everyone aligned.
Example Portal Sections:
| Portal Section | Seller’s Key Question | Sample Content |
|---|---|---|
| Weekly Update | What happened this week? | Broker-approved summary of tours, calls, and updates from data sources |
| Offer Dashboard | Any offers on the table? | List of all active offers (price, buyer, contingencies), with a highlight on the leading offer |
| Buyer Pipeline | Who’s interested or closing? | Names (or ID codes) of interested buyers, tour dates, and pass/active status |
| Data Room Activity | Who viewed our documents? | List of parties that downloaded financials or OM (with dates) |
| Marketing Metrics | Is it getting exposure? | Counts or charts: listing page views, OM downloads, number of tours, days on market |
| Deal Milestones | How is the process progressing? | Visual timeline of listing stages (signed, market, tours, offers, contract) |
Implementation: CRE Client Portal Features Roadmap
You don’t have to build every feature at once. Start lean, then expand. Begin with a single contact per property (avoid the complexity of multiple users initially), and add more viewers later. In practice, this means your Phase 1 portal has core features and one user login.
- Phase 1 (MVP): Include the weekly update, offer list, basic buyer pipeline, and key metrics. This minimal version answers the biggest seller questions.
- Phase 2 (Enhancements): Add data-room activity tracking, sources panel, and improved analytics. Allow multiple seller contacts and more customization.
| Phase | Focus | Key Features |
|---|---|---|
| Phase 1 (MVP) | Launch core update features quickly | AI-powered weekly update, live offer tracker, basic pipeline list, marketing stats |
| Phase 2 | Expand the details and users over time | Data-room activity logs, sources/details panel, multi-user access, advanced charts |
This phased approach avoids a 35-hour build by letting you “ship lean” first. Once the broker and seller love Phase 1, you can gradually roll out the additional portal features and users.
Mobile Access and Security
Ensure your portal works on phones and tablets. Mobile access is essential, as many clients will check their listings on the go. For example, ClientLook’s CRE CRM offers both mobile apps and a responsive web portal: “Rely on ClientLook’s highly rated mobile apps… Also works seamlessly on the built-in browser of any phone or tablet”. In other words, your portal design should be mobile-friendly or have an app, so sellers can log in from anywhere.
Security must be rock solid. Use bank-level encryption and precise permission controls. SuiteDash points out its portal “uses secure, encrypted technology to safeguard your data” with tight access control. Onehub similarly advertises that content is “bank-level encrypted in transit and at rest” and only invited users can view it. Knack emphasizes features like multi-factor authentication and compliance safeguards to protect sensitive contracts and financials. Set up user roles so each client login can only see their own listing’s data. By starting with one contact per property, you keep permissions simple at first; you can later add co-owner or partner logins with limited views.
For communications, embed notifications and messaging. The portal should alert sellers when there’s a new offer or report. For example, LightBox notes that in their CRM portal, clients can “browse updates, download files, and add comments…in real time”. This two-way feedback loop (clients can ask questions or add notes) is part of the professional experience you’re selling.
Join the AI for CRE Collective
Join the AI for CRE Collective – a community of 600+ CRE professionals sharing ideas and building. In the Collective, brokers collaborate on AI-powered tools and real estate tech projects. By engaging with our group, you’ll get proven portal templates, prompts, and demo workflows. You’ll also find honest feedback from peers who have built similar systems for their listings.
If you enjoyed this guide, stay connected: subscribe to the newsletter for new posts. We regularly publish actionable AI and CRE tech insights to help you work faster and wow your clients. Don’t miss updates on building your own portal or exploring the latest CRE tools.
Conclusion
A great CRE client portal is built around your seller’s questions: “Did anyone offer? Who’s interested? Are we marketing it enough? What’s next?” By giving sellers live access to that information – via AI-crafted weekly updates, an offer dashboard, pipeline status, data-room activity, and marketing stats – you differentiate yourself and earn trust. Each section on the portal has a purpose and should reflect real data (calls, CRM updates, transcripts) so nothing is missed. Start with the lean version and one user, then add contacts and features in phases. In your next listing pitch, a portal with these core features will prove you’re working hard on your client’s behalf.
FAQs Regarding CRE Client Portals
What is a CRE client portal?
A CRE client portal is an online dashboard where sellers can securely view updates, documents, and metrics related to their commercial property listing. It replaces scattered emails and calls with a centralized view of the transaction. Portals typically include features like document storage, activity logs, messaging, and analytics.
- Centralized access to listing data and documents
- Real-time or on-demand updates instead of weekly emails
- Secure login for clients to self-serve information
- Automated features reduce manual status reports
Conclusion: A CRE client portal streamlines seller communication and document sharing.
Why should I use a client portal instead of email?
Emails can be missed or forgotten; portals are always available. A portal provides continuous access to information and shows transparency. Clients can log in anytime for updates, reducing the need for phone calls or “Did you send that email?” The portal can also track document downloads and interactions that an email can’t.
- On-demand updates vs. weekly summary
- Central place for all files and messages
- Audit trail of who viewed or edited what
- Improves professionalism and trust
Conclusion: Portals offer clients 24/7 insight and save brokers time.
What content goes in the weekly update section?
The weekly update section should summarize recent activity. This includes AI-drafted notes on new tours, calls, inquiries, and any changed status (e.g., “OM posted” or “Price adjusted”). The broker reviews and publishes it. It answers the seller’s question, “what happened this week?” Key points are listed so the owner can skim highlights.
- Summary of new buyer inquiries or tours held
- Status of offers or negotiations (if any)
- Notable tasks done (like marketing pushes or campaign results)
- Reference to any new documents or listings
Conclusion: Keep it concise; focus on important changes and milestones.
How do I display offers in the portal?
Create an “Offers” or “Bids” table. Include columns like buyer (or anonymous buyer #), offer price, contingencies, and date. Highlight the leading offer. If counters are exchanged, note updates in the status column. This lets sellers see all current offers at a glance.
- List every active offer in detail
- Note if any offers were declined or expired
- Flag which offer is currently the best
- Date-stamp to avoid confusion
Conclusion: Showing offers transparently helps sellers make informed decisions.
What is the buyer pipeline section?
The pipeline lists all prospects and their stage. Think of it as a mini CRM view. It might show names, contact info, last contact date, and current stage (e.g. “visited site,” “reviewing OM,” “submitted LOI,” or “passed”). This answers “who else is in play?” and helps sellers understand market interest.
- Track buyer leads by name or code
- Note their last interaction (tour, call, docs sent)
- Include reasons if a buyer passed on the deal
- Update stage after each milestone (Inquiry → Tour → Offer)
Conclusion: A pipeline view provides context on overall deal flow beyond just the winning bid.
What are marketing metrics, and why include them?
Metrics like listing page views, OM downloads, tour count, and days on market show marketing effectiveness. Display them as counters or simple charts. They answer sellers’ concerns like “Are people looking at my property?” or “Is the brokerage working hard?” For example, showing “2,200 views, 15 tours” upfront demonstrates exposure.
- Views: how many times the listing page has been viewed
- OM Downloads: how many times key documents were downloaded
- Tours: total site tours and inquiries arranged
- Days on market: timeline of listing duration
Conclusion: Concrete numbers build confidence that the listing is being actively marketed.
What is a sources panel?
A sources panel lists the raw inputs behind the updates. It might link to internal notes, CRM events, or call transcripts. This shows sellers the origin of each update line (e.g., “Tour scheduled – broker note from 6/1”). It ensures transparency and that no information is lost between your files and the portal.
- Includes CRM or calendar events you’ve logged
- Can reference meeting notes or email summaries
- Helps broker and seller validate the updates
- Prevents any data from being accidentally omitted
Conclusion: A sources panel documents where your portal information comes from.
How does the portal handle document sharing (data room)?
Treat the portal’s file area like a secure VDR for sellers. Store all marketing materials and due diligence documents there. Track who in the buyer pool downloads each file. Display in the portal who accessed the data room and when. This keeps the seller informed about document interest, just like a traditional data room (for example, RCM notes VDRs share docs securely and track views).
- Provide access to the latest offering memorandum and financials
- Show a log of which prospects downloaded which documents
- Use permissions so only invited parties can see the files
- Update files in one place so everyone stays on the same page
Conclusion: Your portal’s data room section centralizes and secures all documents, with an audit trail.
How do I ensure portal security and access control?
Use fine-grained permissions and encryption. Assign each seller a unique login tied to their listing. For example, Onehub emphasizes that content is “bank-level encrypted” and only invited users have access. Consider multi-factor login. Start with one contact per property to keep it simple (fewer accounts to manage). Later, you can add co-owners or attorneys with limited views.
- Secure the site with SSL/TLS (HTTPS) and strong passwords
- Assign roles (e.g., Owner, Advisor) with appropriate rights
- Keep audit logs (who logs in, from where)
Conclusion: Proper security and permissions protect client data and build trust.
Can a seller leave comments or feedback?
Yes, add a messaging or comments feature. Clients should be able to ask questions directly in the portal. For instance, LightBox notes clients can “add comments that you can see in real time”. This creates a continuous feedback loop. You might even let them upload files back (like updated rent rolls).
- Built-in chat or comment sections under updates
- Email-style message threads tied to each listing
- Notifications so brokers see new comments immediately
Conclusion: Two-way communication on the portal keeps everyone aligned.
How do sellers access the portal?
Via any web browser or mobile app. Most portals are responsive or have companion mobile apps. For example, ClientLook offers iPhone and Android apps for portal access. Ensure your portal works smoothly on phones/tablets. Send clients a one-click login link via email or SMS so they never forget their password.
- Mobile-friendly design or native apps for convenience
- One-time access links can simplify the first login
- Inform clients in advance and offer a quick demo
Conclusion: Make it easy: a mobile-optimized portal means sellers can check in anywhere.
What if I don’t have fancy software – can I still do a portal?
Yes. Even a simple web dashboard or no-code solution works. The key is structure. The user experience should feel like a dashboard, not a spreadsheet. You can build a basic portal in platforms like Notion or with templates (e.g., Knack). Or consider a lightweight secure file-sharing service (like Onehub) combined with manual updates in a shared document.
- Use a secure site or even a shared Google Drive folder + summary doc
- No-code tools (Knack, Airtable, SuiteDash) offer templates
- Keep design clean: labeled sections and bullet-point updates
Conclusion: The specific tool matters less than giving clients a clear, single place to see updates.
Should I mention deals where we did not get an offer?
Probably not in the portal. Focus the portal on what’s happening (tours, interested buyers, offers). Mentioning past opportunities may confuse or worry the seller. If it’s important context, you can note in the buyer pipeline that Buyer X toured and decided not to proceed. But avoid cluttering with every rejection.
- Highlight positive signals (tours, prospect interest) more than negatives
- You can briefly note that a buyer passed through the pipeline stages
- Use closed/not interested to adjust strategy, but keep portal messages optimistic
Conclusion: Keep the portal constructive; concentrate on active opportunities.
How is this different from a client portal vs. a CRM?
A CRM tracks everything internally (leads, calls, deals). A client portal is an external view for the seller only. It pulls from the CRM but shows only what the client needs. The CRM remains your master database; the portal is the client’s window. Unlike a CRM (which your team uses daily), the portal is branded for the client and omits internal notes or other listings.
- CRM = internal, full team info; Portal = external, client-specific subset
- Portal can be powered by CRM data, but is simplified
- CRM users update the portal contents, but sellers see a curated summary
Conclusion: Think of the portal as a public summary of your CRM data for that one listing’s stakeholders.
Can I use the portal to share financials or tenant info?
Yes, especially for leases or investor clients. Include any deal-related docs here. If it’s a major listing, buyers might access a related data room via the portal. For sellers, you might include periodic financial snapshots or lease reports to show performance. Keep sensitive data secure: only list-level users should see it.
- Financial statements, rent rolls, and lease abstracts (redacted as needed)
- Audit logs for each file access
- Highlights of any key lease status (expirations, renewals)
Conclusion: Treat the portal as a secure repository for key deal documents, accessible to approved clients.
What if the client has multiple properties?
You can give each property a separate portal or a unified portal with tabs. Many brokers start with one listing portal at a time. If the same owner has multiple assets, the owner’s portal could list each property as a menu item. Focus initially on one listing; expanding to multiple is a scaling exercise.
- Use one portal login per property for clarity
- Label each portal clearly with the property address or name
- Later, consider a master dashboard listing all properties (Phase 2)
Conclusion: It’s fine to treat each listing as its own project; don’t overcomplicate the first rollout.
Is client training needed?
Keep it simple. Design a clear layout and send a quick launch email. Most clients figure it out by exploring. You could include a short “How to Use this Portal” primer in the first update or a brief onboarding call. Emphasize that updates will be posted here, so they should check it regularly instead of emailing for status.
- Provide a login link and a 1-page guide on sections
- Offer a brief demo via screen share on first use
- Remind them at every phone call that new info is on the portal
Conclusion: Minimal training is needed if the portal is user-friendly; orientation helps set expectations.
Can partners or co-owners access the portal?
Yes, but add them later. Start with a single primary contact to avoid confusion (this prevents duplicate or conflicting updates). Once the system works well, you can invite co-owners or advisors as view-only users. Make sure permission levels are set so they can only see what the broker intended.
- Use unique logins or viewing codes for each user
- Allow only one person to approve updates to avoid conflicts
- Phase 1: main contact only; Phase 2: add others with limited roles
Conclusion: Starting lean with one user keeps things tidy; expand access as needed.
What about notifications? How do clients know to check the portal?
Automate alerts. Have the system email or text the client when a new update is published or an offer comes in. Combine this with periodic reminders (“Check your portal for our latest weekly report”). Push notifications (if you have an app) can help too. The goal is for clients to use the portal as their news feed.
- Auto-email summaries or links after each update
- SMS or app notifications for critical events (new offer, new comments)
- Reminders in your calls/emails: “details are posted on the portal”
Conclusion: Turn on alerts so information finds the client, not the other way around.
